> ## Documentation Index
> Fetch the complete documentation index at: https://docs.2extract.com/llms.txt
> Use this file to discover all available pages before exploring further.
# Quick Start: Your First Request in 2 Minutes
> Follow these 4 simple steps to go from a new account to a successful proxy request in under two minutes.
This guide will walk you through the entire process of setting up your account and making your first successful request through our proxy network. Let's get started!
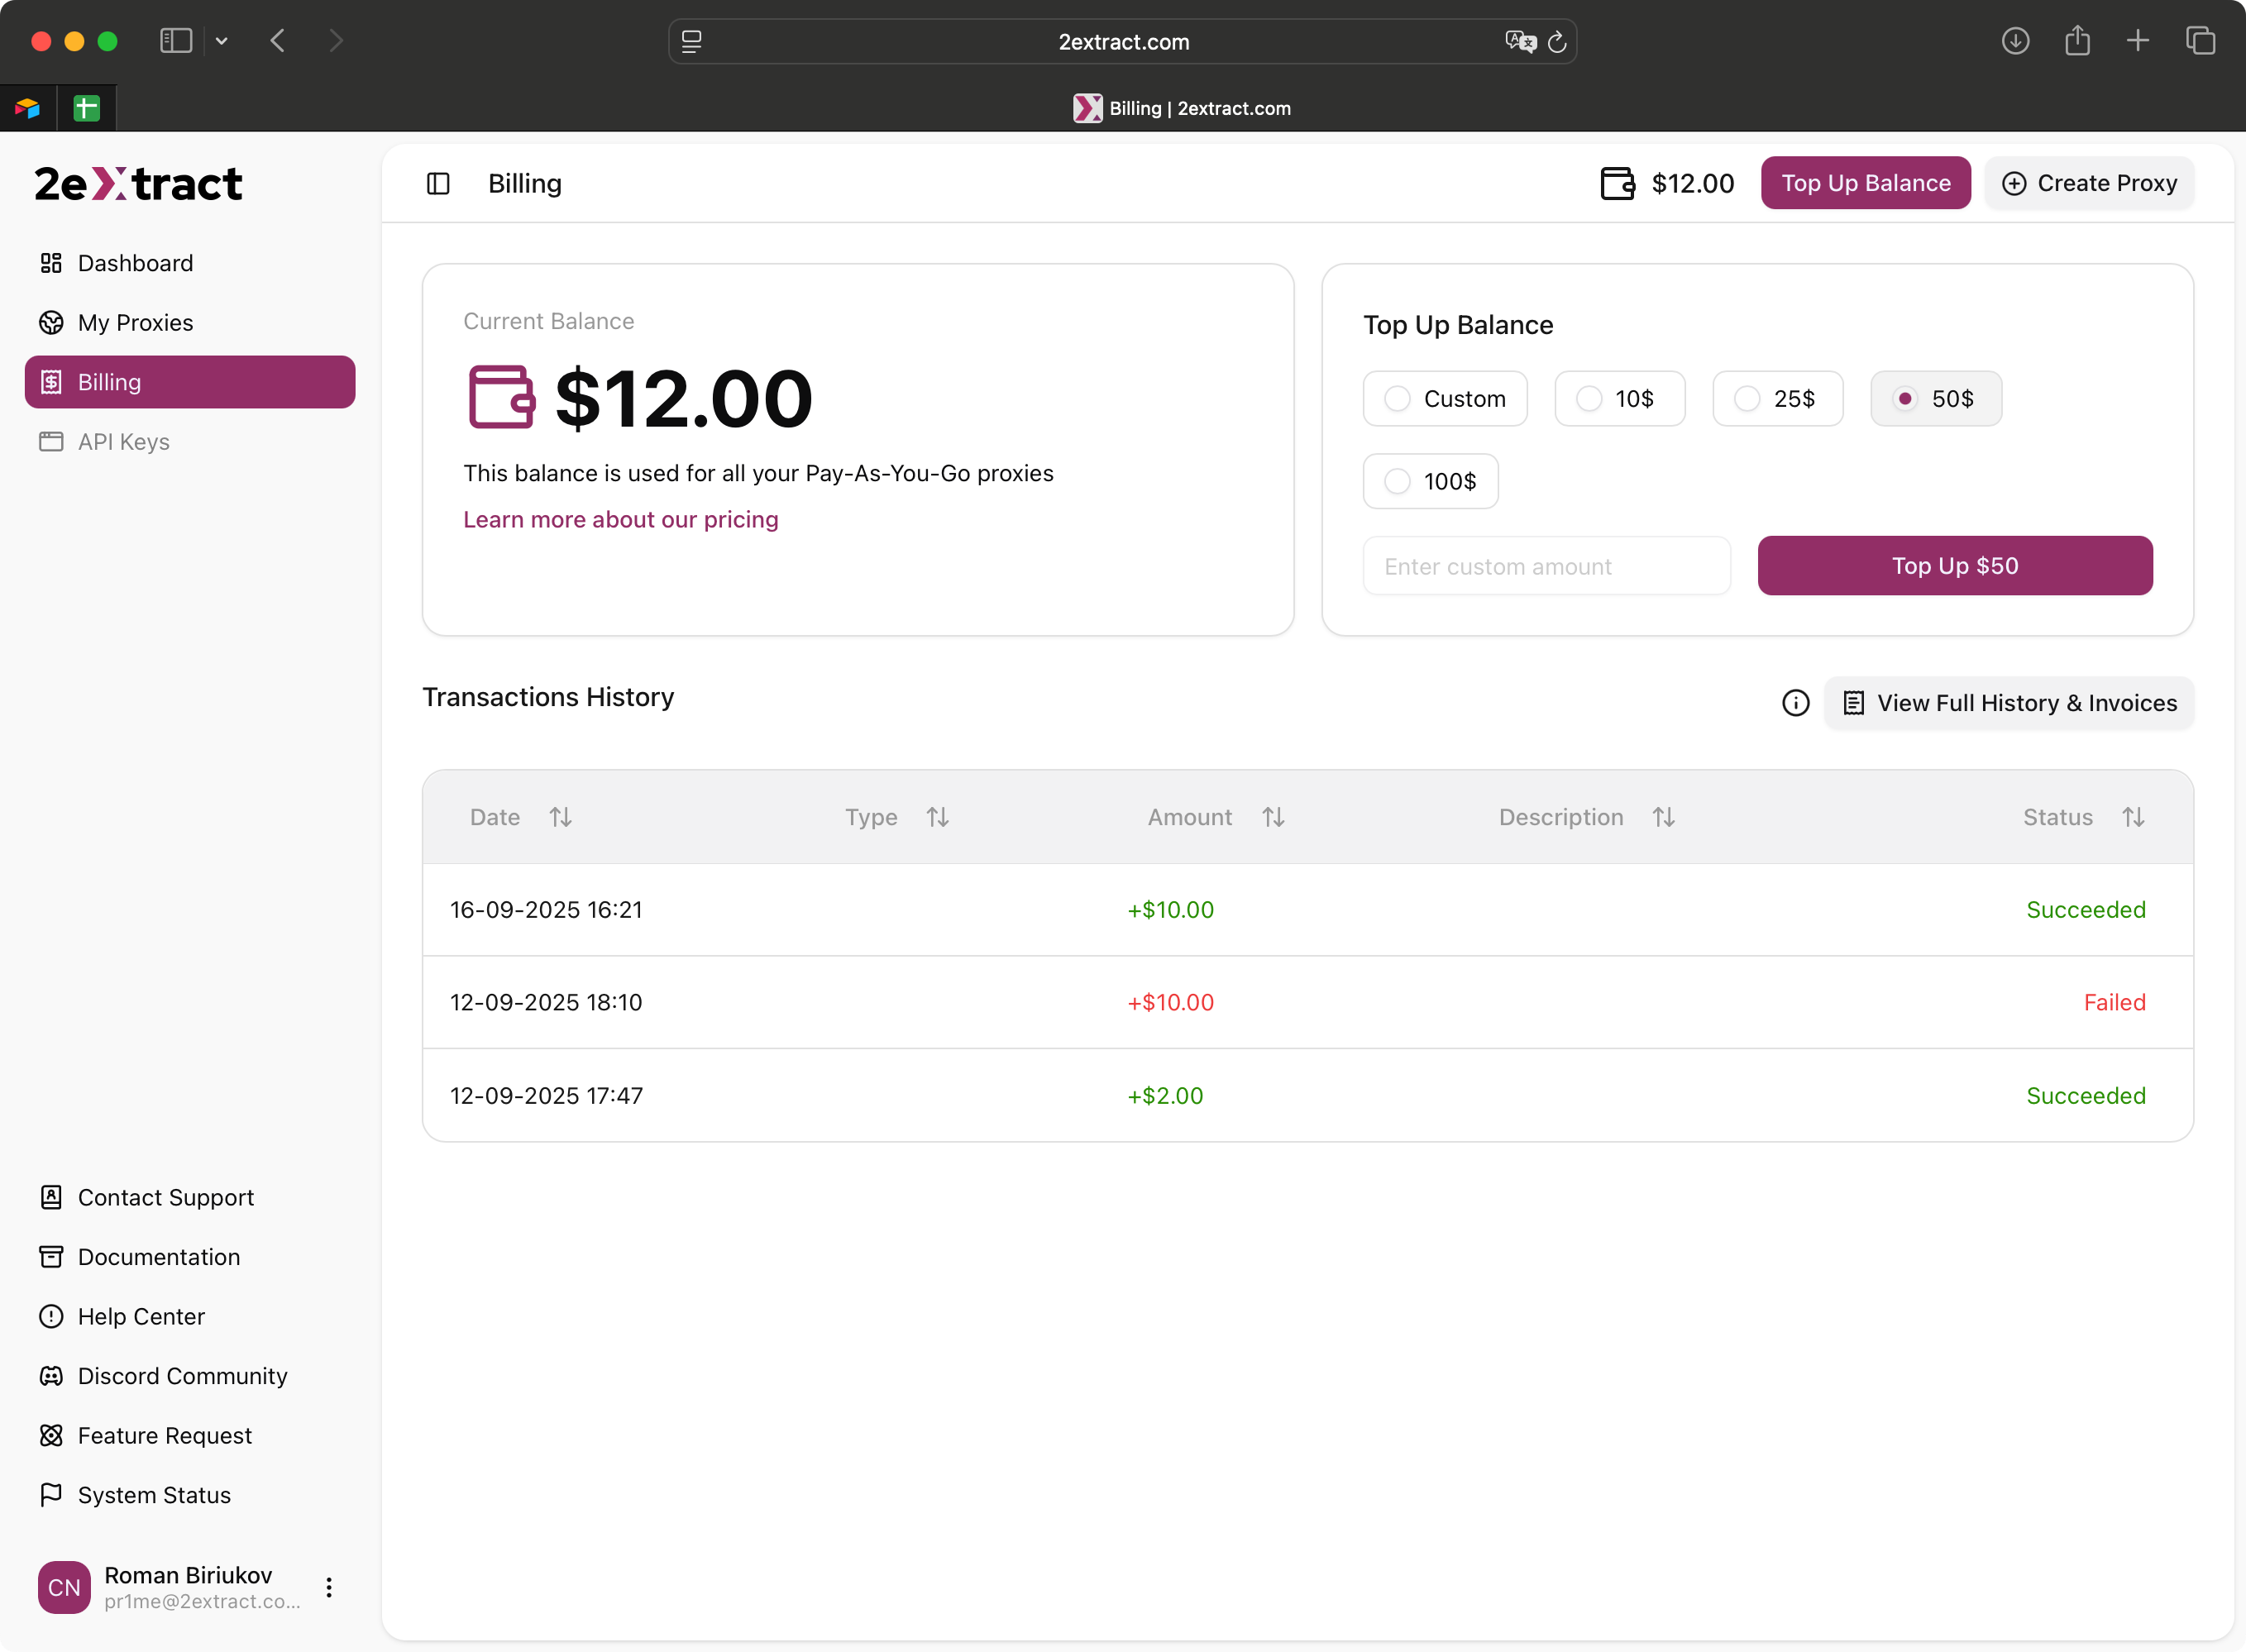
Before you can create a proxy, you need to add funds to your account. All Pay-As-You-Go proxies use this central balance.
1. Navigate to the **[Billing](https://2extract.com/app/billing)** page from the sidebar menu
2. Select a top-up amount or enter a custom one. The minimum is \$10
3. Click the **Top Up** button and complete the payment process via Stripe
Once your payment is successful, you'll see your updated balance on the Billing page and in your dashboard.
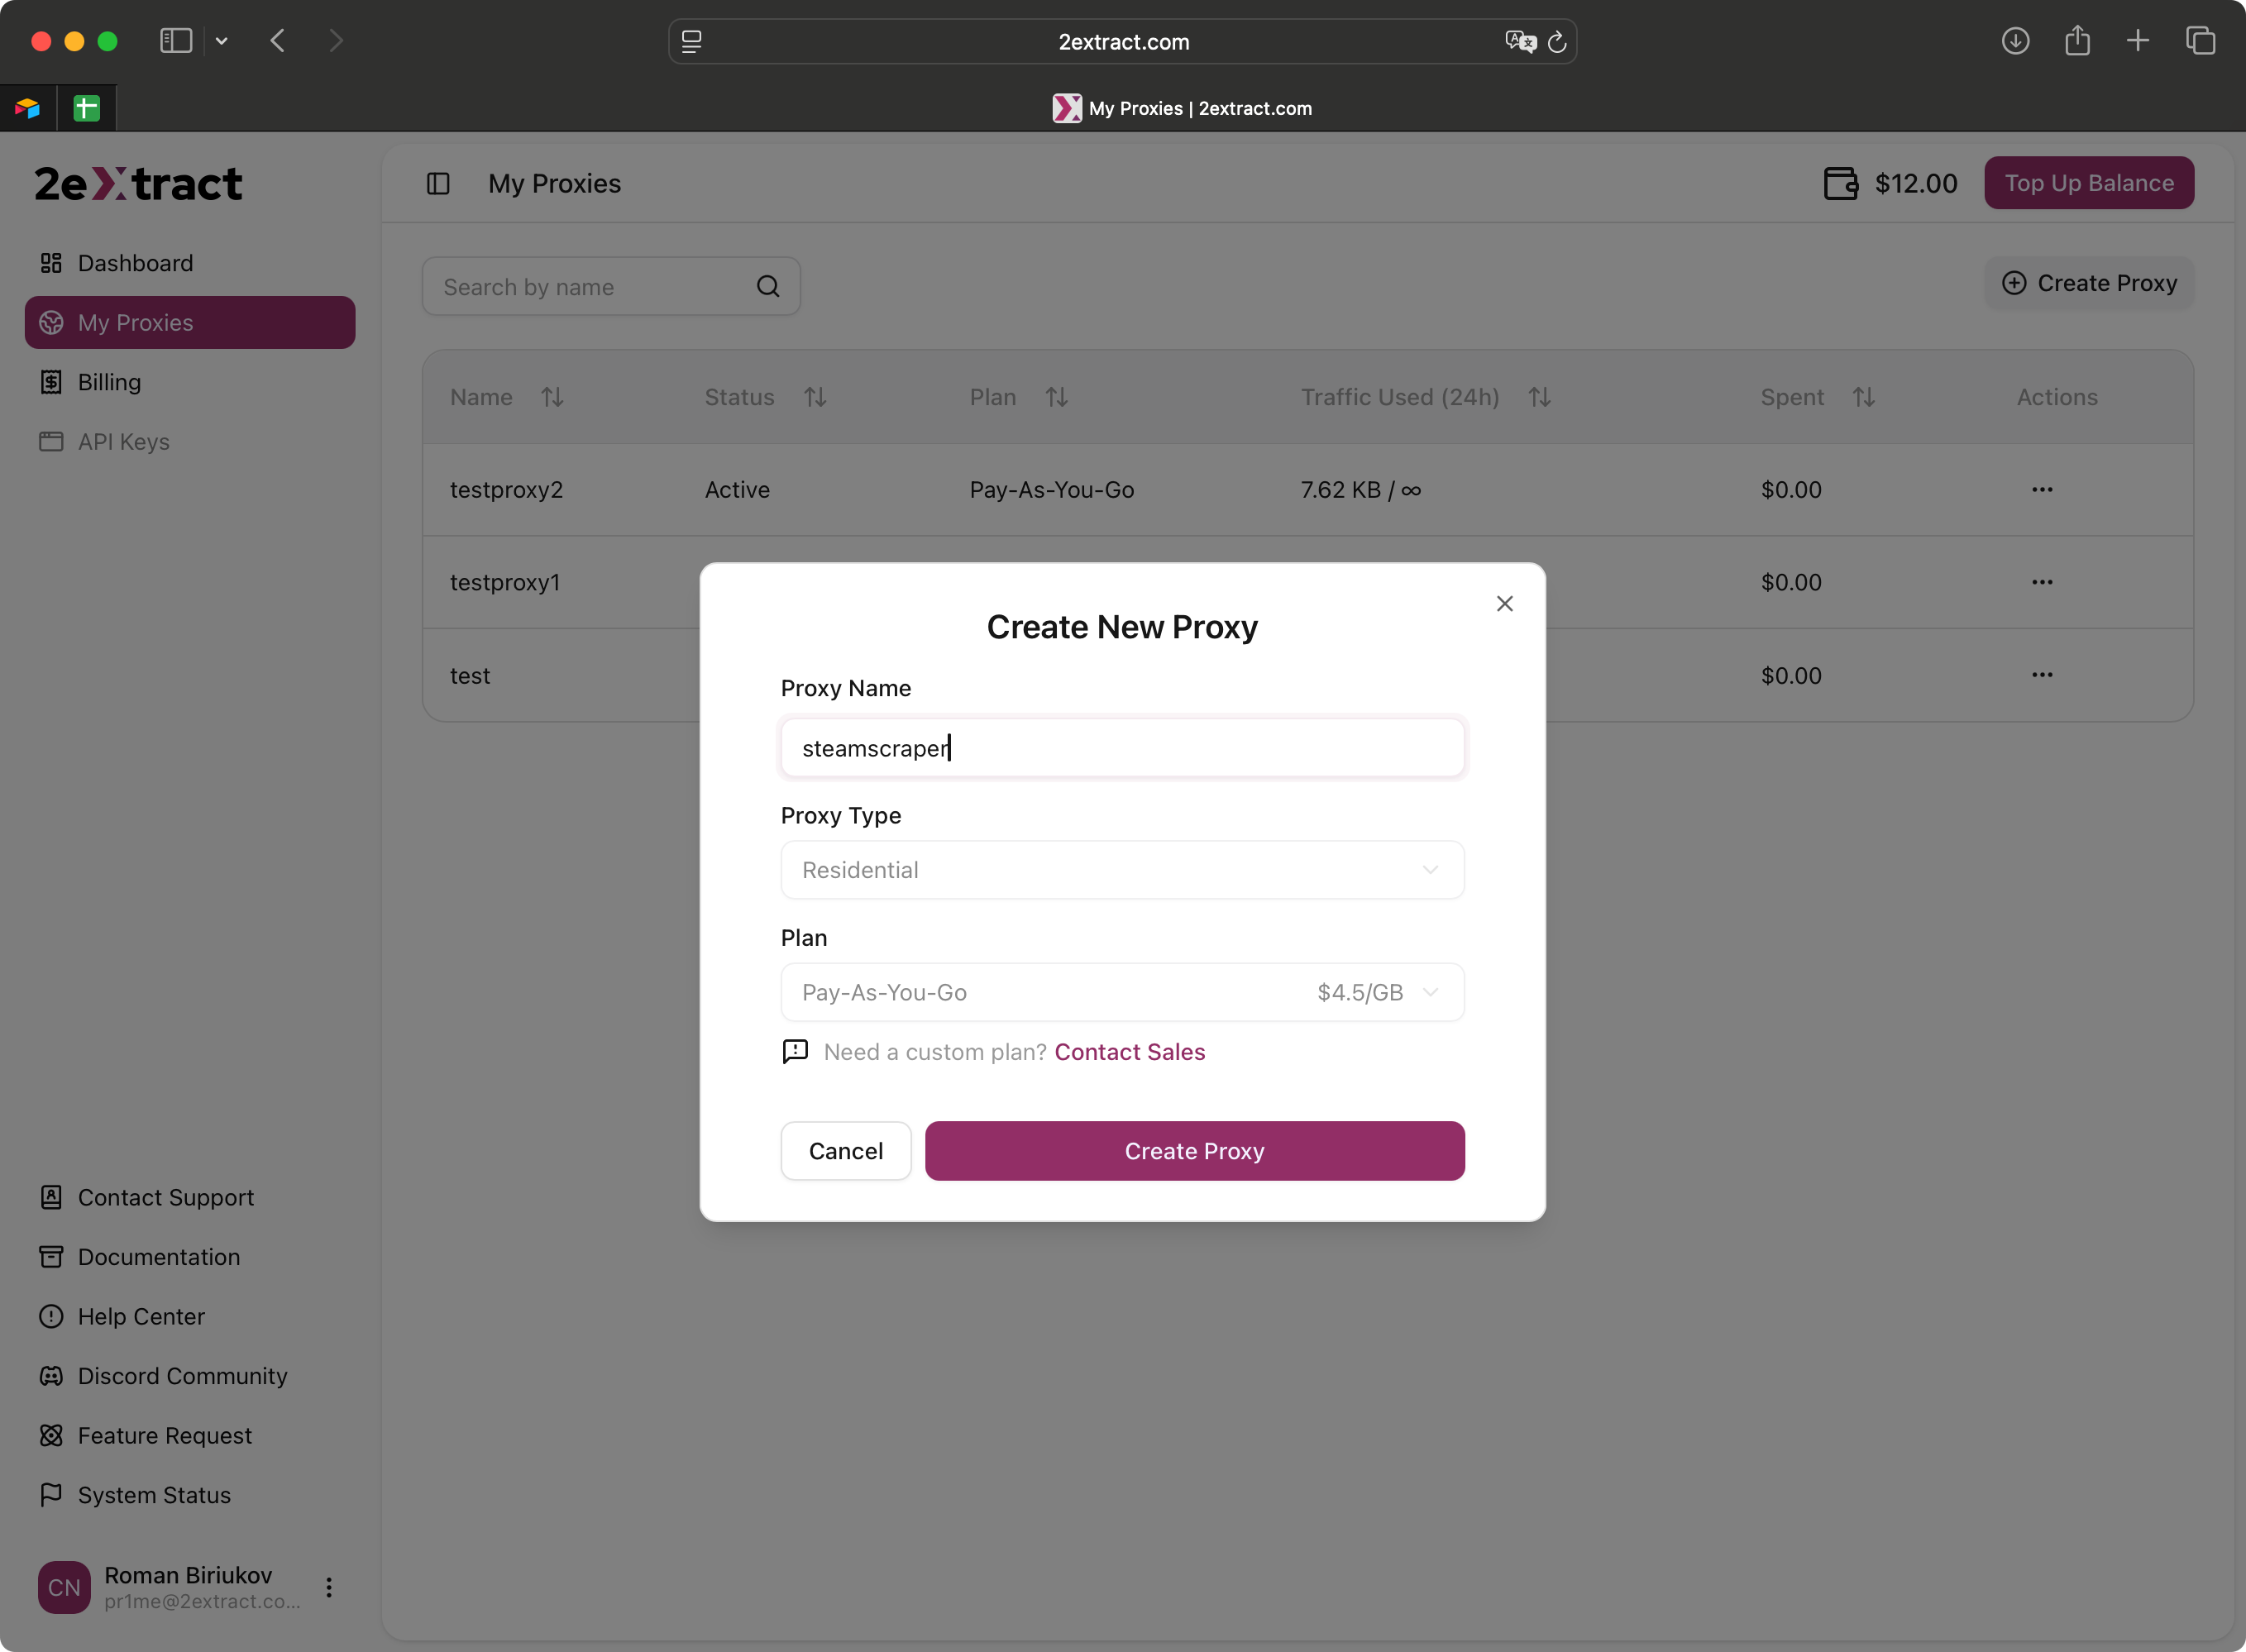
 A proxy is your configurable gateway to our network. Let's create one.
1. Navigate to the **[My Proxies](https://2extract.com/app/proxies)** page
2. Click the **+ Create Proxy** button
3. On the proxy creation pop-up:
* Give your proxy a memorable **Name**, like `myfirstscraper`
* For now, you can leave all other settings at their defaults
4. Click **Create Proxy**
Choose your proxy name carefully. It **cannot be changed** after creation.
You will be redirected to the settings page for your newly created proxy.
A proxy is your configurable gateway to our network. Let's create one.
1. Navigate to the **[My Proxies](https://2extract.com/app/proxies)** page
2. Click the **+ Create Proxy** button
3. On the proxy creation pop-up:
* Give your proxy a memorable **Name**, like `myfirstscraper`
* For now, you can leave all other settings at their defaults
4. Click **Create Proxy**
Choose your proxy name carefully. It **cannot be changed** after creation.
You will be redirected to the settings page for your newly created proxy.
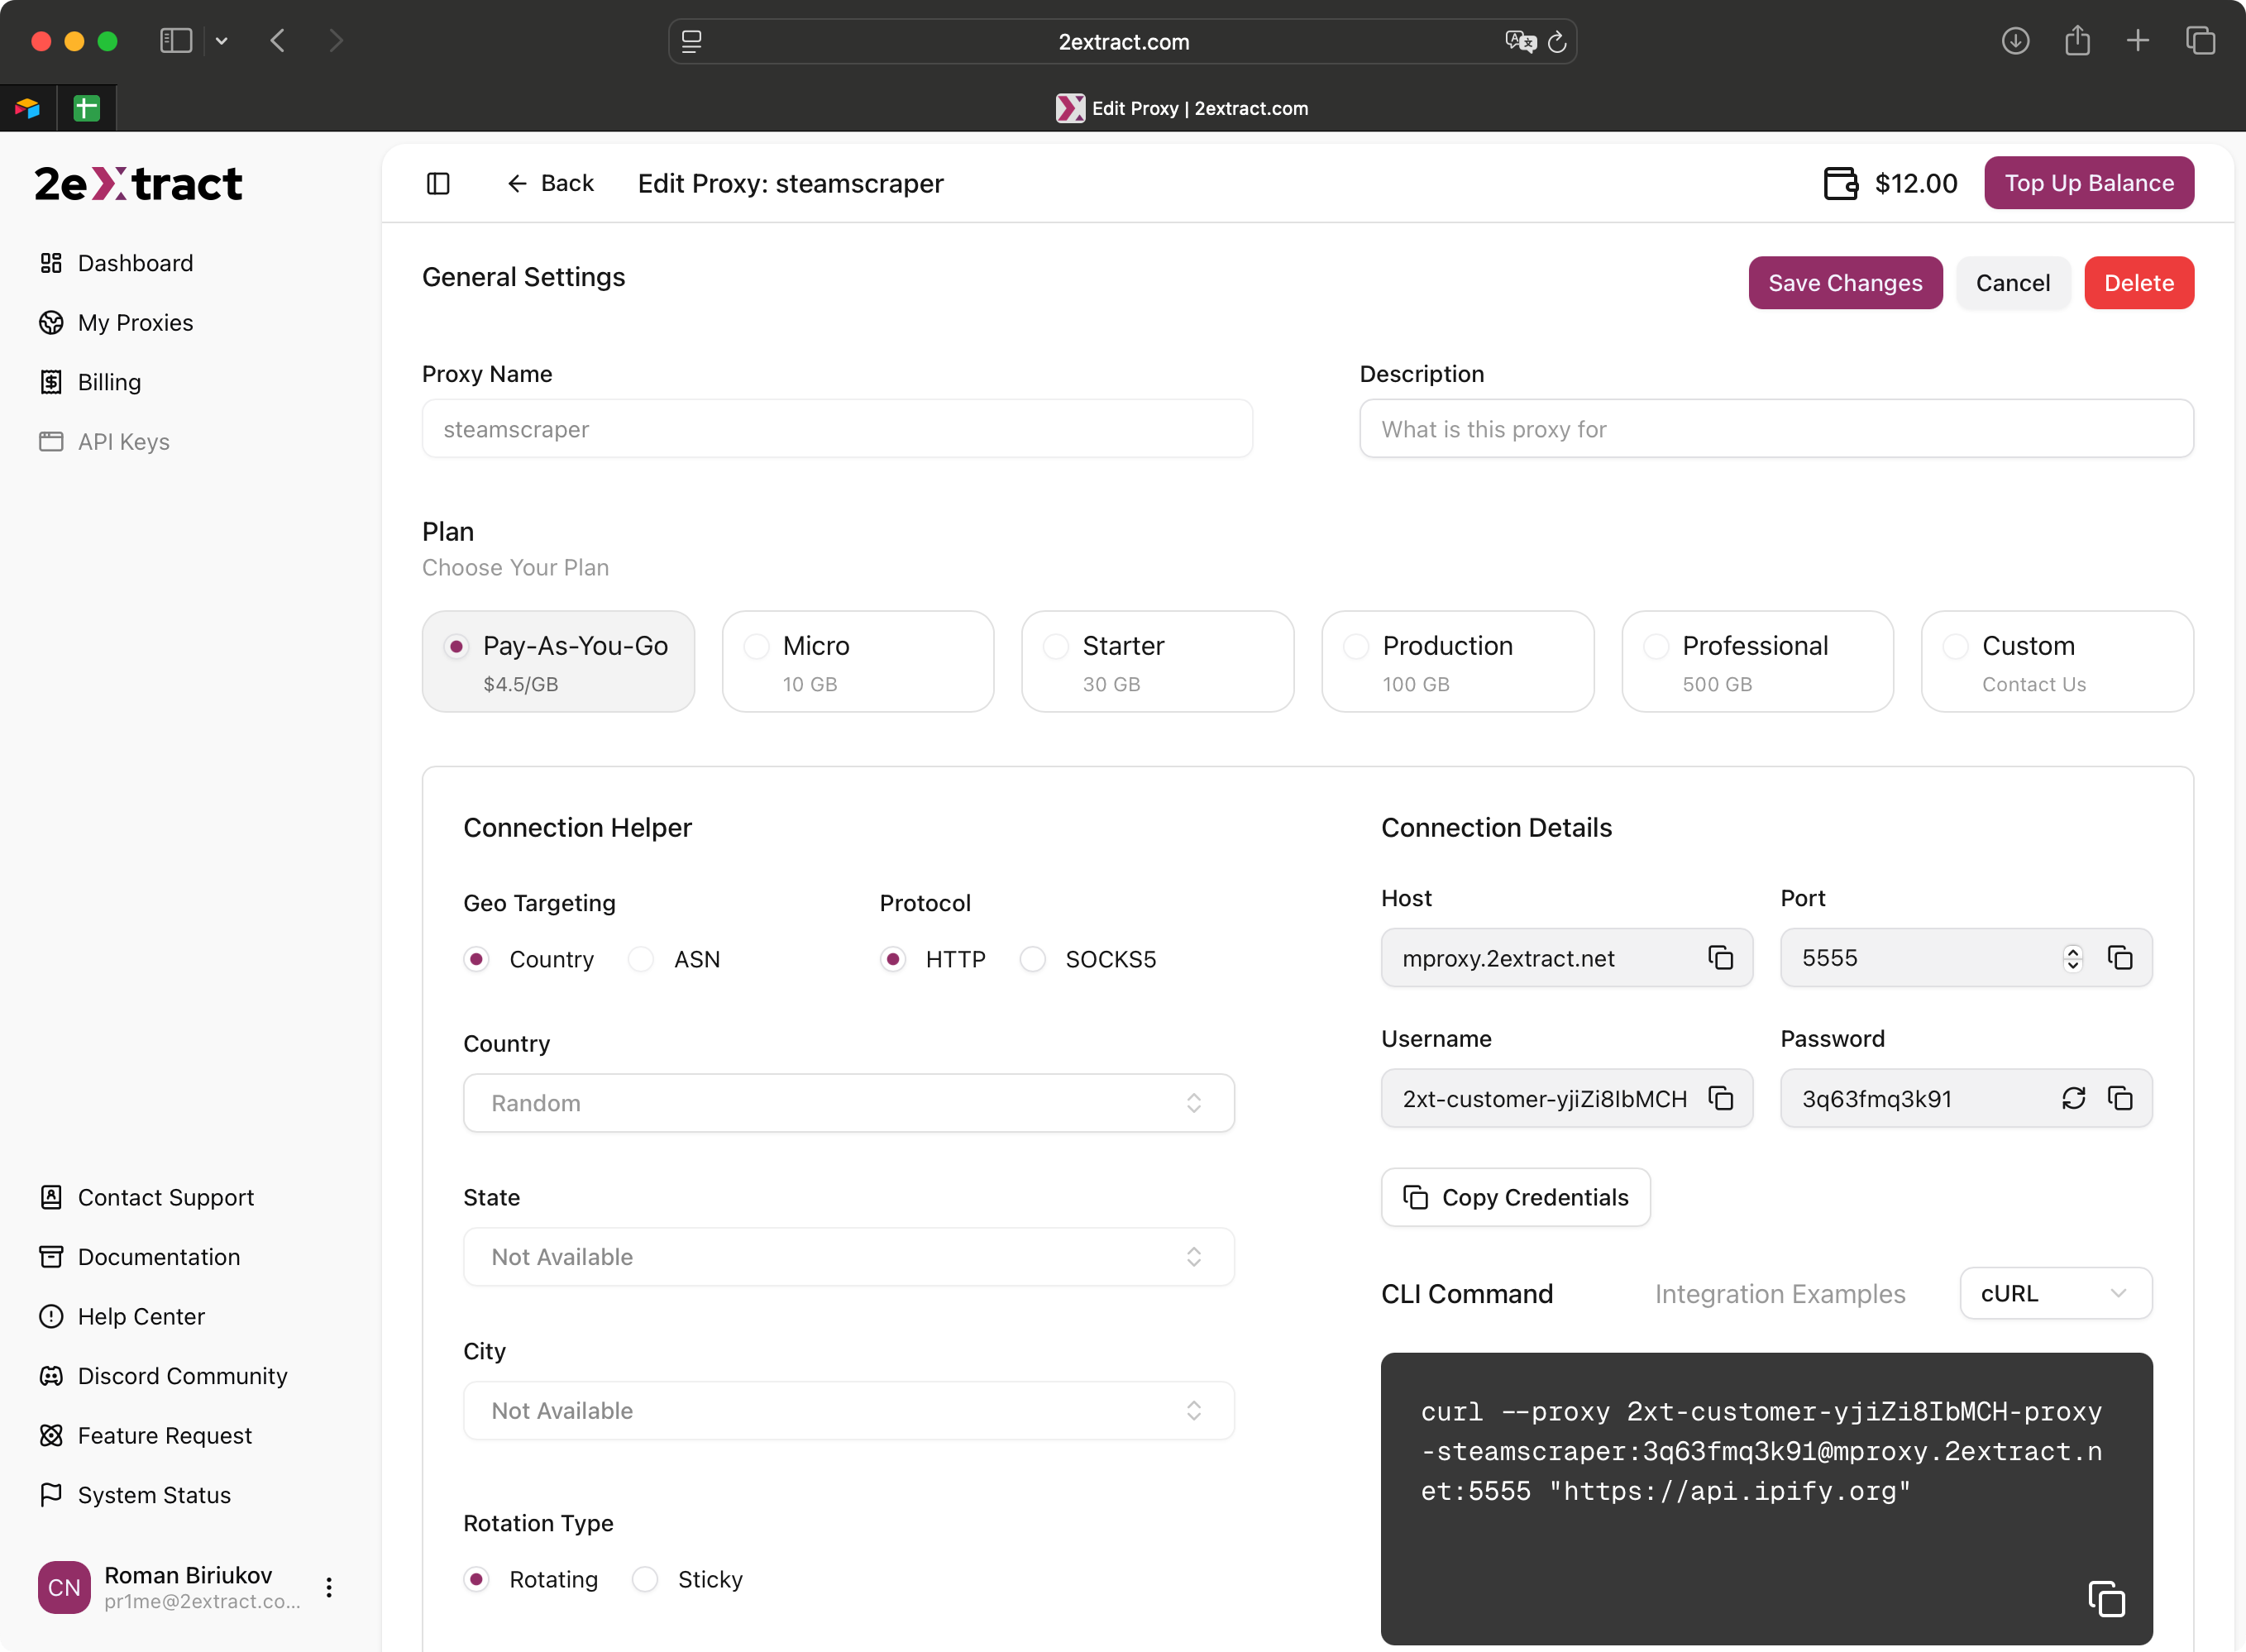
 On your new proxy's settings page, you'll find the "Connection Details" block. The easiest way to get your credentials is to use the **Copy Credentials** button.
1. Click the **Copy Credentials** button
2. A dropdown menu will appear with different formats
3. Click the "Copy" icon next to the `username:password@host:port` format
You can also copy each part individually if you prefer.
For security, your password is only shown here. We will never email it to you.
On your new proxy's settings page, you'll find the "Connection Details" block. The easiest way to get your credentials is to use the **Copy Credentials** button.
1. Click the **Copy Credentials** button
2. A dropdown menu will appear with different formats
3. Click the "Copy" icon next to the `username:password@host:port` format
You can also copy each part individually if you prefer.
For security, your password is only shown here. We will never email it to you.
 Now you're ready to test your connection. The easiest way is with a `cURL` command in your terminal. This command will ask for your real IP address through the proxy.
1. Open your terminal (on macOS, Linux, or Windows)
2. Copy the command below and **replace** `PROXY_USERNAME` and `PROXY_PASSWORD` with the credentials you copied in the previous step
```bash cURL theme={null}
curl --proxy PROXY_USERNAME:PROXY_PASSWORD@proxy.2extract.net:5555 "https://api.ipify.org"
```
```python ip_check.py theme={null}
import requests
proxy_user = 'PROXY_USERNAME'
proxy_pass = 'PROXY_PASSWORD'
proxy_host = 'proxy.2extract.net'
proxy_port = '5555'
proxies = {
'http': f'http://{proxy_user}:{proxy_pass}@{proxy_host}:{proxy_port}',
'https': f'http://{proxy_user}:{proxy_pass}@{proxy_host}:{proxy_port}',
}
response = requests.get('https://api.ipify.org?format=json', proxies=proxies)
print(response.json())
```
Press Enter. If everything is correct, you will see a response like this, showing a residential IP address:
```json theme={null}
{"ip":"123.45.67.89"}
```
You've just made your first successful request through the 2extract network. You're now ready to integrate our proxies into any of your projects.
## Next Steps
Learn how to control geo-targeting and sessions.
Find examples for Puppeteer, Scrapy, and more.
Now you're ready to test your connection. The easiest way is with a `cURL` command in your terminal. This command will ask for your real IP address through the proxy.
1. Open your terminal (on macOS, Linux, or Windows)
2. Copy the command below and **replace** `PROXY_USERNAME` and `PROXY_PASSWORD` with the credentials you copied in the previous step
```bash cURL theme={null}
curl --proxy PROXY_USERNAME:PROXY_PASSWORD@proxy.2extract.net:5555 "https://api.ipify.org"
```
```python ip_check.py theme={null}
import requests
proxy_user = 'PROXY_USERNAME'
proxy_pass = 'PROXY_PASSWORD'
proxy_host = 'proxy.2extract.net'
proxy_port = '5555'
proxies = {
'http': f'http://{proxy_user}:{proxy_pass}@{proxy_host}:{proxy_port}',
'https': f'http://{proxy_user}:{proxy_pass}@{proxy_host}:{proxy_port}',
}
response = requests.get('https://api.ipify.org?format=json', proxies=proxies)
print(response.json())
```
Press Enter. If everything is correct, you will see a response like this, showing a residential IP address:
```json theme={null}
{"ip":"123.45.67.89"}
```
You've just made your first successful request through the 2extract network. You're now ready to integrate our proxies into any of your projects.
## Next Steps
Learn how to control geo-targeting and sessions.
Find examples for Puppeteer, Scrapy, and more.