> ## Documentation Index
> Fetch the complete documentation index at: https://docs.2extract.com/llms.txt
> Use this file to discover all available pages before exploring further.
# Overview
> Connect 2extract proxies to any anti-detect browser and rotate the exit IP on demand with the IP Change URL.
Anti-detect browsers all handle proxies the same way: you fill in four values, the browser routes the profile through your proxy, and an optional link lets you swap the exit IP without touching anything else. This page covers the whole flow in a browser-agnostic way.
Looking for click-by-click steps in a specific app? Pick it from the **Anti-Detect Browsers** list in the sidebar - Multilogin, Dolphin Anty, GoLogin, AdsPower, Octo Browser and two dozen more.
**Before you start:** have your proxy credentials ready. You will find them on your proxy's page in the [2extract.com Dashboard](https://2extract.com/app/proxies):
* **Host:** `proxy.2extract.net`
* **Port:** `5555`
* **Username:** (e.g., `2xt-customer-...`)
* **Password:** (Your proxy's password)
***
## Where to find your values
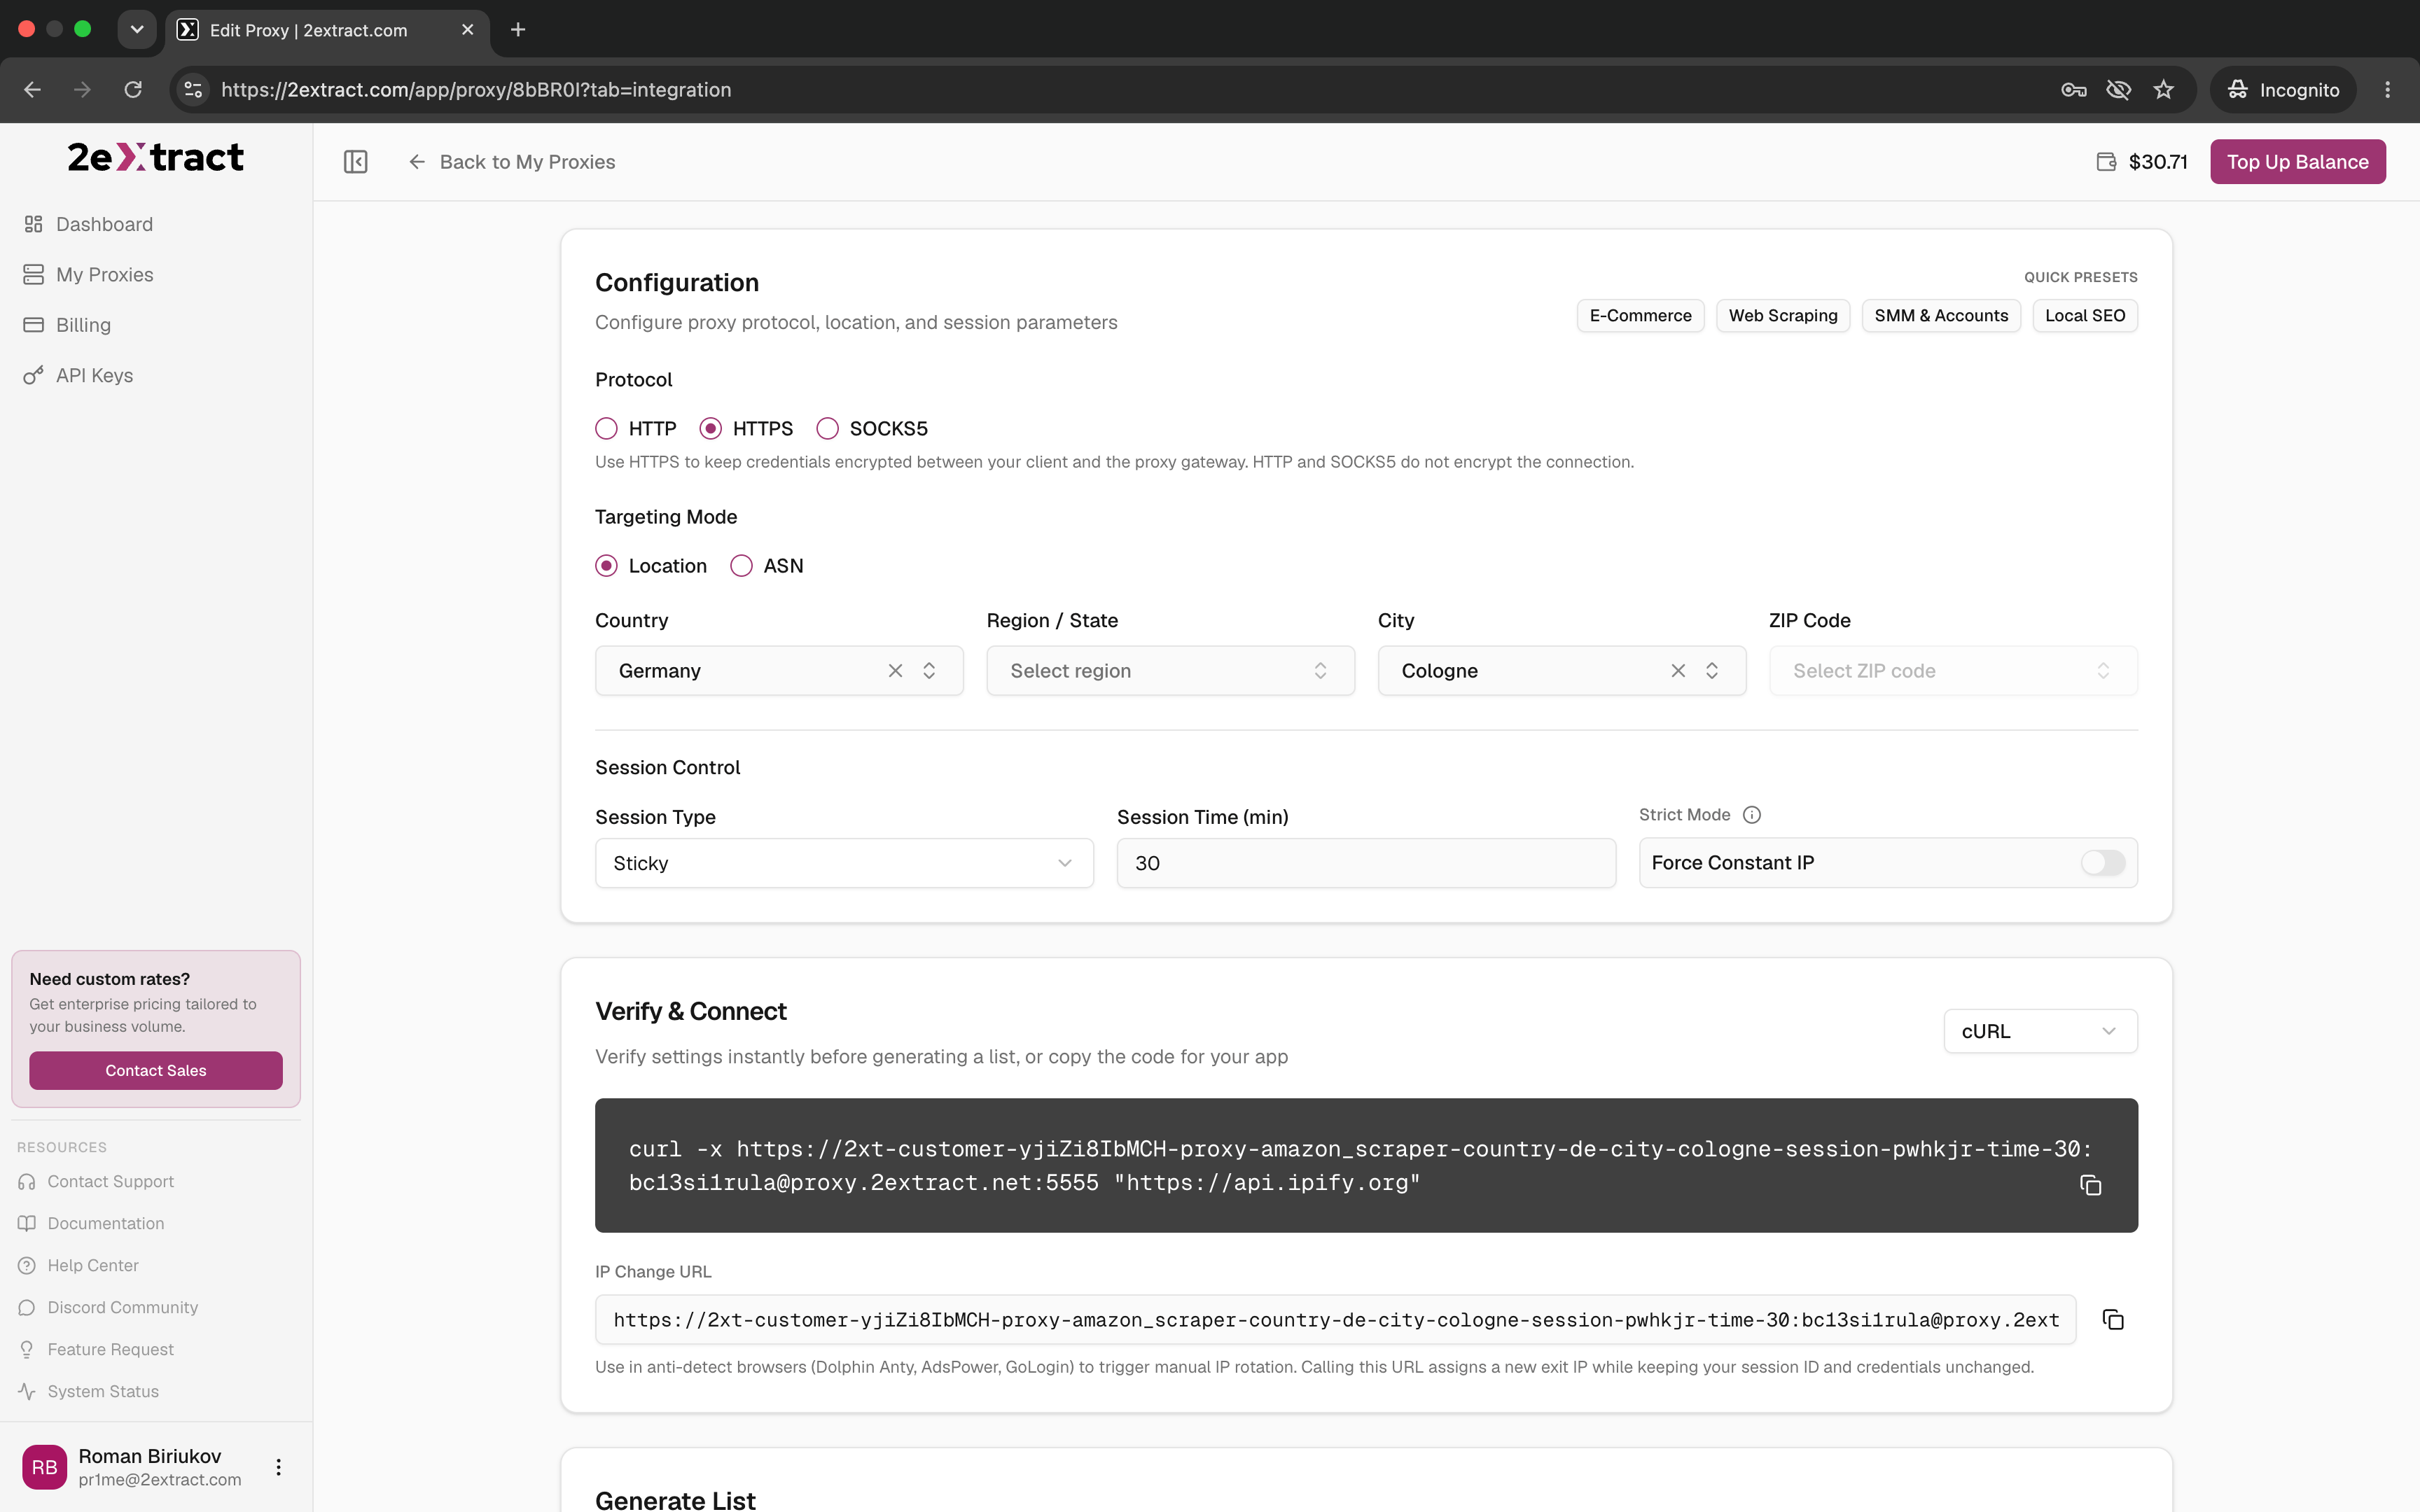
Everything you need to paste into a browser profile lives on one screen: open your proxy in the [Dashboard](https://2extract.com/app/proxies) and go to the **Integration** tab. The **Verify & Connect** block holds the ready-made connection string and, for sticky sessions, the **IP Change URL**. Below it, **Generate List** exports many connection strings at once for tools that import proxies in bulk - the whole tab is covered in [Connection Builder](/proxy-products/configuration/endpoint-generator).
 ***
## Connecting the proxy
Create a new browser profile or edit an existing one and find the section named **Proxy**, **Connection** or **Network**. Some browsers keep a separate proxy library instead - in that case add the proxy there first, then assign it to the profile.
Pick **HTTP** or **HTTPS**. Both are supported on the same port. Choose **SOCKS5** only if your workflow specifically needs it - see [Connection Protocols](/proxy-products/configuration/protocols).
| Field in the browser | What to enter |
| :--------------------------- | :----------------------------------------------------------- |
| Host / IP / Server / Address | `proxy.2extract.net` |
| Port | `5555` |
| Login / Username / User | Your proxy **Username** (the long `2xt-customer-...` string) |
| Password | Your proxy **Password** |
Field names differ between apps, the values do not. If the browser asks for a single line instead of separate fields, paste the connection string from **Verify & Connect**:
```
https://USERNAME:PASSWORD@proxy.2extract.net:5555
```
**Setting up more than one profile? Use Generate List instead.** The **Generate List** card at the bottom of the same tab exports ready lines in the layout your browser expects - `host:port:user:pass`, `user:pass@host:port` or `host,port,user,pass` - so you paste them straight into the import field instead of assembling anything by hand. Set the quantity, pick the format, press **Generate**, then **Copy All** or download a `.txt` / `.csv`. Every line carries its own session ID, so each profile gets an independent sticky IP.
Use the **Check Proxy** or **Test Connection** button that almost every anti-detect browser provides. A working setup returns the exit IP and its location. If it fails, start with [407 Proxy Authentication Required](/help/common-problems/407-proxy-authentication-required).
Save the settings. All traffic inside that profile now goes through your proxy.
Copy the username straight from the dashboard. It carries your geo-targeting and session parameters inside the string, so an edited or truncated username changes the behavior of the proxy or breaks authentication outright.
***
## Pick the right session type first
The username you copy already contains the session parameters, so decide this before you paste it anywhere.
The profile keeps one exit IP across requests, which is what a browser profile needs to stay consistent. Set **Session Type** to **Sticky** on the Integration tab before copying the username.
Every request gets a different IP. Fine for scraping, wrong for a browser profile: pages would load assets through several IPs at once and sites will treat the session as suspicious.
Full details on session IDs, lifetime and the `-const` flag are in [Session Control Parameters](/proxy-products/configuration/session).
***
## The IP Change URL
Most anti-detect browsers have a field called **IP change link**, **Change IP URL**, **Rotation URL** or **Link to change IP** next to the proxy settings. The browser stores the URL and calls it when you press the **Change IP** button in its interface. That is all the field does: it fires an HTTP request to the address you saved.
For a sticky session, 2extract gives you that address ready to use:
```
https://USERNAME:PASSWORD@proxy.2extract.net:5555/change_ip
```
It is the same credentials and the same host as your connection string, with `/change_ip` on the end. No separate token to manage. The scheme follows the protocol you selected for the proxy, so copy the URL from the dashboard rather than typing it out.
The field is shown only when **Session Type** is **Sticky**. A rotating proxy already changes its IP on every request, so there is nothing to trigger.
### Setting it up
1. Copy the **IP Change URL** from the **Verify & Connect** block with the copy button.
2. Paste it into the IP change field of your browser profile.
3. Save the profile. The **Change IP** button in the browser is now live.
### One profile, one URL
The URL works on the session ID carried inside the username it contains, so it rotates that one session and nothing else. Pressing **Change IP** in one profile never touches the others.
This matters when your profiles come from **Generate List**, because every generated line has its own session ID. The IP Change URL shown in **Verify & Connect** belongs to the string displayed right above it, not to the generated lines - pasting it into all your profiles would point them at a session none of them use.
Build each profile's URL from the credentials of the line that profile runs on:
```
{scheme}://USERNAME:PASSWORD@proxy.2extract.net:5555/change_ip
```
Take `USERNAME` and `PASSWORD` from that line, keep the host and port unchanged, and use the same scheme as the profile's proxy (`http` or `https`). Generating the list in the `user:pass@host:port` format makes this mechanical: add the scheme in front and `/change_ip` at the end.
**Copy the connection string and the IP Change URL as a pair.** Both carry the same session ID. Whenever you change targeting - country, region, city, ZIP or ASN - the dashboard generates a new session ID, so the two strings you copied earlier both go stale. Re-copy both into the profile.
### What happens when you press "Change IP"
1. The browser sends a request to the URL you saved.
2. We release the exit IP currently pinned to that session ID.
3. **The new IP is assigned on the next request through the proxy**, not at the moment you click.
So the click itself looks like nothing happened: there is no page reload, no popup, no visible change in the browser. Reload the page, or open an IP checker inside the profile, and you will see the new address.
Everything else stays exactly as it was - your username, password, session ID and geo-targeting are untouched. You do not need to edit the profile or re-copy anything after a rotation.
Rotation works even with the `-const` flag set. `-const` exists to stop *silent* automatic rotation when a peer goes offline; pressing Change IP is a deliberate action, so it goes through.
### What it does to your browser profile
Nothing in the profile itself changes. Fingerprint, User-Agent, cookies, localStorage, saved logins and open tabs all survive the rotation - the only thing that changes is the address the site sees.
That is still a visible event for the site you are on:
* **You may get logged out or asked to verify again.** Plenty of sites bind a session to an IP. A mid-session IP change can log you out, trigger a confirmation email or raise a captcha. Rotate between tasks rather than in the middle of a checkout or a login flow.
* **The new IP comes from the same targeting, not the same place.** If your proxy is targeted at a country only, the next IP can be a different city, a different region and a different ISP within that country. For profiles that must look stable, target a city or a ZIP code - see [Geo-Targeting](/proxy-products/configuration/geo-targeting).
* **Keep the profile's timezone and locale aligned.** If the browser profile pins a timezone manually, a new IP in another region of the same country can put the two out of sync. Either let the browser derive timezone from the proxy, or pin your targeting tightly enough that it cannot drift.
***
## Troubleshooting
The new IP is handed out on the next request, so check after a page reload rather than straight away. Also make sure the page you are checking is not served from the browser cache - open a fresh tab with an IP checker instead of reloading a cached one.
The proxy is in rotating mode. Switch **Session Type** to **Sticky** in the Configuration block and the field appears under the code snippet. Remember to re-copy the connection string as well, since switching to sticky generates a session ID.
A `404` means the credentials in the URL did not match an active proxy: the username or password is wrong, was edited by hand, or the proxy has been deleted. Re-copy the URL from the dashboard. If the proxy still exists and the copied URL fails, contact [support@2extract.com](mailto:support@2extract.com).
Changing targeting produces a new session ID, which invalidates both strings you pasted into the profile earlier. Copy the connection string and the IP Change URL again and replace both.
Sticky sessions are best-effort: residential peers go offline, and when yours does we assign a replacement IP so your work continues. If you would rather have the request fail than silently move to another IP, use the `-const` flag described in [Session Control Parameters](/proxy-products/configuration/session).
***
## Next steps
Session IDs, lifetime, and strict mode.
Pin your profile to a country, city, ZIP or ASN.
Step-by-step guides for 27 anti-detect browsers.
***
## Connecting the proxy
Create a new browser profile or edit an existing one and find the section named **Proxy**, **Connection** or **Network**. Some browsers keep a separate proxy library instead - in that case add the proxy there first, then assign it to the profile.
Pick **HTTP** or **HTTPS**. Both are supported on the same port. Choose **SOCKS5** only if your workflow specifically needs it - see [Connection Protocols](/proxy-products/configuration/protocols).
| Field in the browser | What to enter |
| :--------------------------- | :----------------------------------------------------------- |
| Host / IP / Server / Address | `proxy.2extract.net` |
| Port | `5555` |
| Login / Username / User | Your proxy **Username** (the long `2xt-customer-...` string) |
| Password | Your proxy **Password** |
Field names differ between apps, the values do not. If the browser asks for a single line instead of separate fields, paste the connection string from **Verify & Connect**:
```
https://USERNAME:PASSWORD@proxy.2extract.net:5555
```
**Setting up more than one profile? Use Generate List instead.** The **Generate List** card at the bottom of the same tab exports ready lines in the layout your browser expects - `host:port:user:pass`, `user:pass@host:port` or `host,port,user,pass` - so you paste them straight into the import field instead of assembling anything by hand. Set the quantity, pick the format, press **Generate**, then **Copy All** or download a `.txt` / `.csv`. Every line carries its own session ID, so each profile gets an independent sticky IP.
Use the **Check Proxy** or **Test Connection** button that almost every anti-detect browser provides. A working setup returns the exit IP and its location. If it fails, start with [407 Proxy Authentication Required](/help/common-problems/407-proxy-authentication-required).
Save the settings. All traffic inside that profile now goes through your proxy.
Copy the username straight from the dashboard. It carries your geo-targeting and session parameters inside the string, so an edited or truncated username changes the behavior of the proxy or breaks authentication outright.
***
## Pick the right session type first
The username you copy already contains the session parameters, so decide this before you paste it anywhere.
The profile keeps one exit IP across requests, which is what a browser profile needs to stay consistent. Set **Session Type** to **Sticky** on the Integration tab before copying the username.
Every request gets a different IP. Fine for scraping, wrong for a browser profile: pages would load assets through several IPs at once and sites will treat the session as suspicious.
Full details on session IDs, lifetime and the `-const` flag are in [Session Control Parameters](/proxy-products/configuration/session).
***
## The IP Change URL
Most anti-detect browsers have a field called **IP change link**, **Change IP URL**, **Rotation URL** or **Link to change IP** next to the proxy settings. The browser stores the URL and calls it when you press the **Change IP** button in its interface. That is all the field does: it fires an HTTP request to the address you saved.
For a sticky session, 2extract gives you that address ready to use:
```
https://USERNAME:PASSWORD@proxy.2extract.net:5555/change_ip
```
It is the same credentials and the same host as your connection string, with `/change_ip` on the end. No separate token to manage. The scheme follows the protocol you selected for the proxy, so copy the URL from the dashboard rather than typing it out.
The field is shown only when **Session Type** is **Sticky**. A rotating proxy already changes its IP on every request, so there is nothing to trigger.
### Setting it up
1. Copy the **IP Change URL** from the **Verify & Connect** block with the copy button.
2. Paste it into the IP change field of your browser profile.
3. Save the profile. The **Change IP** button in the browser is now live.
### One profile, one URL
The URL works on the session ID carried inside the username it contains, so it rotates that one session and nothing else. Pressing **Change IP** in one profile never touches the others.
This matters when your profiles come from **Generate List**, because every generated line has its own session ID. The IP Change URL shown in **Verify & Connect** belongs to the string displayed right above it, not to the generated lines - pasting it into all your profiles would point them at a session none of them use.
Build each profile's URL from the credentials of the line that profile runs on:
```
{scheme}://USERNAME:PASSWORD@proxy.2extract.net:5555/change_ip
```
Take `USERNAME` and `PASSWORD` from that line, keep the host and port unchanged, and use the same scheme as the profile's proxy (`http` or `https`). Generating the list in the `user:pass@host:port` format makes this mechanical: add the scheme in front and `/change_ip` at the end.
**Copy the connection string and the IP Change URL as a pair.** Both carry the same session ID. Whenever you change targeting - country, region, city, ZIP or ASN - the dashboard generates a new session ID, so the two strings you copied earlier both go stale. Re-copy both into the profile.
### What happens when you press "Change IP"
1. The browser sends a request to the URL you saved.
2. We release the exit IP currently pinned to that session ID.
3. **The new IP is assigned on the next request through the proxy**, not at the moment you click.
So the click itself looks like nothing happened: there is no page reload, no popup, no visible change in the browser. Reload the page, or open an IP checker inside the profile, and you will see the new address.
Everything else stays exactly as it was - your username, password, session ID and geo-targeting are untouched. You do not need to edit the profile or re-copy anything after a rotation.
Rotation works even with the `-const` flag set. `-const` exists to stop *silent* automatic rotation when a peer goes offline; pressing Change IP is a deliberate action, so it goes through.
### What it does to your browser profile
Nothing in the profile itself changes. Fingerprint, User-Agent, cookies, localStorage, saved logins and open tabs all survive the rotation - the only thing that changes is the address the site sees.
That is still a visible event for the site you are on:
* **You may get logged out or asked to verify again.** Plenty of sites bind a session to an IP. A mid-session IP change can log you out, trigger a confirmation email or raise a captcha. Rotate between tasks rather than in the middle of a checkout or a login flow.
* **The new IP comes from the same targeting, not the same place.** If your proxy is targeted at a country only, the next IP can be a different city, a different region and a different ISP within that country. For profiles that must look stable, target a city or a ZIP code - see [Geo-Targeting](/proxy-products/configuration/geo-targeting).
* **Keep the profile's timezone and locale aligned.** If the browser profile pins a timezone manually, a new IP in another region of the same country can put the two out of sync. Either let the browser derive timezone from the proxy, or pin your targeting tightly enough that it cannot drift.
***
## Troubleshooting
The new IP is handed out on the next request, so check after a page reload rather than straight away. Also make sure the page you are checking is not served from the browser cache - open a fresh tab with an IP checker instead of reloading a cached one.
The proxy is in rotating mode. Switch **Session Type** to **Sticky** in the Configuration block and the field appears under the code snippet. Remember to re-copy the connection string as well, since switching to sticky generates a session ID.
A `404` means the credentials in the URL did not match an active proxy: the username or password is wrong, was edited by hand, or the proxy has been deleted. Re-copy the URL from the dashboard. If the proxy still exists and the copied URL fails, contact [support@2extract.com](mailto:support@2extract.com).
Changing targeting produces a new session ID, which invalidates both strings you pasted into the profile earlier. Copy the connection string and the IP Change URL again and replace both.
Sticky sessions are best-effort: residential peers go offline, and when yours does we assign a replacement IP so your work continues. If you would rather have the request fail than silently move to another IP, use the `-const` flag described in [Session Control Parameters](/proxy-products/configuration/session).
***
## Next steps
Session IDs, lifetime, and strict mode.
Pin your profile to a country, city, ZIP or ASN.
Step-by-step guides for 27 anti-detect browsers.